One of the core properties of automated tests is that they should be reliable, meaning that a test should either pass or fail, no matter how many times or in what conditions it is being run. Tests that tend to sometimes fail with no clear reason are usually called flaky, and those are a real problem. At some point the development team would just give up fixing flaky tests time and time again and will stop running them at all - and suddenly we’ve lost that safety net guarding us against inevitable regressions. While unit tests should generally not allow any room for flakiness by mocking out all dependencies, functional tests are a different story. A classic example would be testing a simple screen that loads data from network - it will fail every time you run it while offline! So how do we go about writing reliable functional tests, that are not affected by network conditions? In this article I’ll describe an approach that uses Dagger to create clean and robust functional tests.
So what’s Dagger?
Dagger has become a pretty standard tool in many Android developers’ arsenals, however, for those who haven’t heard - it’s a fast dependency injection framework, developed by Square, and specifically optimized for Android. Unlike some of the other popular dependency injectors, Dagger doesn’t use reflection and relies on generated code for speed. We’ll use Dagger in our app to be able to substitute our dependencies with test doubles in a clean way, without breaking encapsulation or writing unnecessary code that will only be used by tests. So let’s get going!
The Weather app
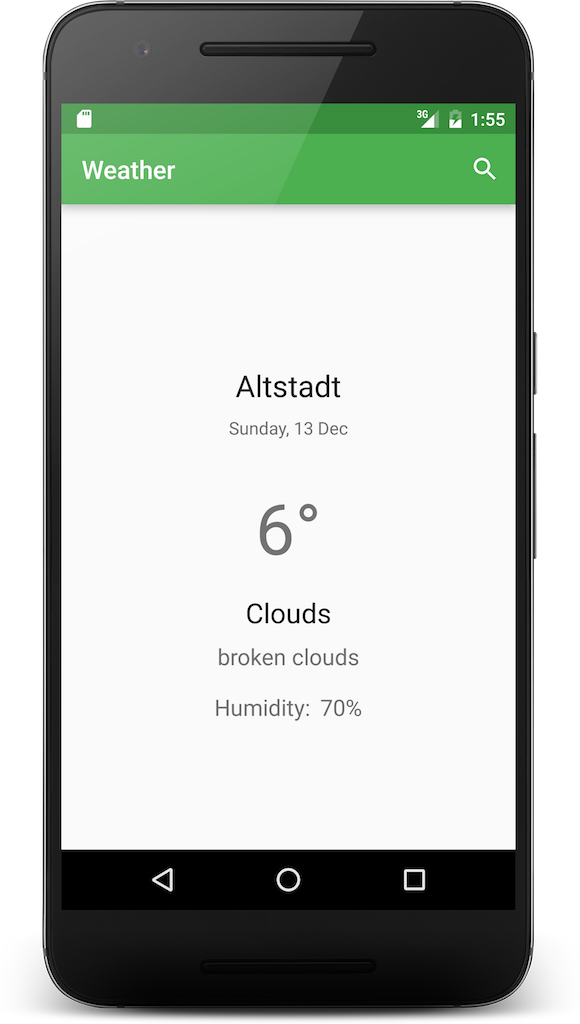
We’ll develop a simple one-screen weather app for demonstration purposes. The app should ask the user to provide the name of the city and will download some information about current weather in this city. That’s how it looks:
The complete source code is available on GitHub.
OpenWeatherMap API
We’ll use the OpenWeatherMap API to access weather data. The API is free, however you’ll need to sign up for an API key if you want to download the code and compile the app on your machine.
REST API client setup
Let’s start with setting up the REST API client that will implement data fetching. We’ll be using
Retrofit along with RxJava, so the following dependencies go to our
build.gradle file:
dependencies {
    // rest of dependencies

    compile 'com.squareup.retrofit:retrofit:1.9.0'
    compile 'io.reactivex:rxandroid:1.0.1'
}
Next is a simple POJO called WeatherData that will represent the information we fetch from the
server:
public class WeatherData {

    public static final String DATE_FORMAT = "EEEE, d MMM";

    private static final int KELVIN_ZERO = 273;

    private static final String FORMAT_TEMPERATURE_CELSIUS = "%d°";
    private static final String FORMAT_HUMIDITY = "%d%%";

    private String name;
    private Weather[] weather;
    private Main main;

    public String getCityName() {
        return name;
    }

    public String getWeatherDate() {
        return new SimpleDateFormat(DATE_FORMAT, Locale.getDefault()).format(new Date());
    }

    public String getWeatherState() {
        return weather().main;
    }

    public String getWeatherDescription() {
        return weather().description;
    }

    public String getTemperatureCelsius() {
        return String.format(FORMAT_TEMPERATURE_CELSIUS, (int) main.temp - KELVIN_ZERO);
    }

    public String getHumidity() {
        return String.format(FORMAT_HUMIDITY, main.humidity);
    }

    private Weather weather() {
        return weather[0];
    }

    private static class Weather {
        private String main;
        private String description;
    }

    private static class Main {
        private float temp;
        private int humidity;
    }
}
And then the simple Retrofit interface, containing the description of a GET request we’ll be making to fetch the data:
public interface WeatherApiClient {

    Endpoint ENDPOINT = Endpoints.newFixedEndpoint("http://api.openweathermap.org/data/2.5");

    @GET("/weather") Observable<WeatherData> getWeatherForCity(@Query("q") String cityName);
}
And that’s it so far for the networking setup. Let’s now set up Dagger and teach it to provide an
implementation of WeatherApiClient to the classes that will be using it.
Dagger setup
To add Dagger to your project, add the following lines to build.gradle:
final DAGGER_VERSION = '2.0.2'

dependencies {
    // Retrofit dependencies are here

    compile "com.google.dagger:dagger:${DAGGER_VERSION}"
    apt "com.google.dagger:dagger-compiler:${DAGGER_VERSION}"
    provided 'org.glassfish:javax.annotation:10.0-b28'
}
You’ll notice apt scope used to include the dagger-compiler artefact: since dagger-compiler is
an annotation processor, we’ll only want to use it at compilation stage and not package it into the
APK (dagger-compiler is actually pretty big in terms of dex method count). This can be achieved by
using the android-apt plugin. Add the following line to your top-level build.gradle
file:
buildscript {
    dependencies {
        // other classpath declarations
        classpath 'com.neenbedankt.gradle.plugins:android-apt:1.8'
    }
}
And then the following at the top of the app build.gradle file, right below the
apply plugin: 'com.android.application':
apply plugin: 'com.neenbedankt.android-apt'
Now we’re all set with the dependencies. Let’s proceed with creating a Dagger module, which will describe our logic of providing dependencies:
@Module
public class AppModule {

    private final Context context;

    public AppModule(Context context) {
        this.context = context.getApplicationContext();
    }

    @Provides @AppScope public Context provideAppContext() {
        return context;
    }

    @Provides public WeatherApiClient provideWeatherApiClient() {
        return new RestAdapter.Builder()
                .setEndpoint(WeatherApiClient.ENDPOINT)
                .setRequestInterceptor(apiKeyRequestInterceptor())
                .setLogLevel(BuildConfig.DEBUG ? RestAdapter.LogLevel.FULL : RestAdapter.LogLevel.NONE)
                .build()
                .create(WeatherApiClient.class);
    }

    private RequestInterceptor apiKeyRequestInterceptor() {
        return new ApiKeyRequestInterceptor(context.getString(R.string.open_weather_api_key));
    }
}
As you can see, provideWeatherApiClient() is actually creating and returning the instance of
WeatherApiClient: this code will be called by Dagger every time we’ll request it to provide us
with an instance of WeatherApiClient. Sweet! Now let’s add a Component interface, that will
describe the contract of the dependency graph of our app, created by Dagger:
@AppScope
@Component(modules = AppModule.class)
public interface AppComponent {

    void inject(MainActivity activity);

    @AppScope Context appContext();

    WeatherApiClient weatherApiClient();
}
The AppComponent is able to provide the instance of the application Context and instances of
WeatherApiClient, and it can also inject dependencies into the MainActivity.
Finally, we’ll need to instantiate our AppComponent and make it available to other classes. We’ll
add the following into our custom Application class called WeatherApp:
public class WeatherApp extends Application {

    private AppComponent appComponent;

    @Override
    public void onCreate() {
        super.onCreate();

        appComponent = DaggerAppComponent.builder()
                .appModule(new AppModule(this))
                .build();
    }

    public AppComponent appComponent() {
        return appComponent;
    }
}
Now let’s switch to MainActivity and see how we can access WeatherApiClient and fetch weather
data.
MainActivity
The relevant parts of the MainActivity are as follows (complete source):
public class MainActivity extends AppCompatActivity implements SearchView.OnQueryTextListener {

    @Inject WeatherApiClient weatherApiClient;

    @Override
    protected void onCreate(Bundle savedInstanceState) {
        super.onCreate(savedInstanceState);
        ((WeatherApp) getApplication()).appComponent().inject(this);
    }

    @Override
    public boolean onQueryTextSubmit(String query) {
        if (!TextUtils.isEmpty(query)) {
            loadWeatherData(query);
        }
        return true;
    }

    private void loadWeatherData(String cityName) {
        subscription = weatherApiClient.getWeatherForCity(cityName)
                .subscribeOn(Schedulers.io())
                .observeOn(AndroidSchedulers.mainThread())
                .subscribe(
                        // handle result
                        }
                );
    }
}
Notice how we instantiate WeatherApiClient: instead of doing it manually we’re marking it with an
@Inject annotation and doing the following in onCreate():
((WeatherApp) getApplication()).appComponent().inject(this);
By accessing our AppComponent and requesting it to inject the MainActivity we’re asking Dagger
to satisfy all the dependencies, marked with @Inject, which it successfully does. Now we can use
WeatherApiClient to fetch the data.
Although this approach looks verbose and anything else but straightforward at first glance, the power is in the fact that we don’t hardcode the logic of creating dependencies in the code itself. This will prove very useful when we’ll need to substitute the dependencies in test mode, which is our next step.
Espresso setup
Let’s now integrate Espresso into our project and write a test to verify that we can correctly load
and display weather data. First, add the following to the build.gradle file:
final ESPRESSO_VERSION = '2.2.1'
final ESPRESSO_RUNNER_VERSION = '0.4'

dependencies {
    // 'compile' dependencies

    androidTestCompile "com.android.support.test:runner:${ESPRESSO_RUNNER_VERSION}"
    androidTestCompile "com.android.support.test:rules:${ESPRESSO_RUNNER_VERSION}"
    androidTestCompile "com.android.support.test.espresso:espresso-core:${ESPRESSO_VERSION}"
    androidTestApt "com.google.dagger:dagger-compiler:${DAGGER_VERSION}"
}
Notice that we also need to mention dagger-compiler here, since our test code must also be
processed by the annotation processor. And then let’s add the following test class:
@LargeTest
@RunWith(AndroidJUnit4.class)
public class MainActivityTest {

    private static final String CITY_NAME = "München";

    @Rule public ActivityTestRule<MainActivity> activityTestRule = new ActivityTestRule<>(MainActivity.class);

    @Inject WeatherApiClient weatherApiClient;

    @Before
    public void setUp() {
        weatherApiClient = ((WeatherApp) activityTestRule.getActivity().getApplication()).appComponent()
                .weatherApiClient();
    }

    @Test
    public void correctWeatherDataDisplayed() {
        WeatherData weatherData = weatherApiClient.getWeatherForCity(CITY_NAME).toBlocking().first();

        onView(withId(R.id.action_search)).perform(click());
        onView(withId(android.support.v7.appcompat.R.id.search_src_text)).perform(replaceText(CITY_NAME));
        onView(withId(android.support.v7.appcompat.R.id.search_src_text)).perform(pressKey(KeyEvent.KEYCODE_ENTER));

        onView(withId(R.id.city_name)).check(matches(withText(weatherData.getCityName())));
        onView(withId(R.id.weather_date)).check(matches(withText(weatherData.getWeatherDate())));
        onView(withId(R.id.weather_state)).check(matches(withText(weatherData.getWeatherState())));
        onView(withId(R.id.weather_description)).check(matches(withText(weatherData.getWeatherDescription())));
        onView(withId(R.id.temperature)).check(matches(withText(weatherData.getTemperatureCelsius())));
        onView(withId(R.id.humidity)).check(matches(withText(weatherData.getHumidity())));
    }
}
The test case is pretty straightforward: we want to load the data for a certain city and verify that
it’s displayed correctly. It should work fine in most cases, but imagine running it on a device in
Airplane mode - it will most definitely fail! Since our test case is designed to verify that the app
displays the data correctly, lack of data due to inability to connect to the network is not a valid
scenario to make the test case fail. In addition, we’ll probably want to write another test case
that checks that our app behaves well in Airplane mode, showing a meaningful error to the user, -
how do we make both test cases pass at the same time? Dagger to the rescue! Let’s leverage the power
of dependency injection and provide an implementation of WeatherApiClient that we could configure
with data that we expect to receive.
MockWeatherApiClient
A solution we’re looking for is a WeatherApiClient that just returns hardcoded data. Let’s create
a TestData class that will store a JSON representation of the response we’re expecting to receive:
public final class TestData {

    public static final String MUNICH_WEATHER_DATA_JSON = "\n" +
            "{\n" +
            "    \"coord\": {\n" +
            "        \"lon\": 11.58,\n" +
            "        \"lat\": 48.14\n" +
            "    },\n" +
            "    \"weather\": [{\n" +
            "        \"id\": 741,\n" +
            "        \"main\": \"Fog\",\n" +
            "        \"description\": \"fog\",\n" +
            "        \"icon\": \"50n\"\n" +
            "    }],\n" +
            "    \"base\": \"cmc stations\",\n" +
            "    \"main\": {\n" +
            "        \"temp\": 275.68,\n" +
            "        \"pressure\": 1030,\n" +
            "        \"humidity\": 93,\n" +
            "        \"temp_min\": 274.15,\n" +
            "        \"temp_max\": 277.15\n" +
            "    },\n" +
            "    \"wind\": {\n" +
            "        \"speed\": 1.5,\n" +
            "        \"deg\": 240\n" +
            "    },\n" +
            "    \"clouds\": {\n" +
            "        \"all\": 0\n" +
            "    },\n" +
            "    \"dt\": 1449350400,\n" +
            "    \"sys\": {\n" +
            "        \"type\": 1,\n" +
            "        \"id\": 4887,\n" +
            "        \"message\": 0.0134,\n" +
            "        \"country\": \"DE\",\n" +
            "        \"sunrise\": 1449298092,\n" +
            "        \"sunset\": 1449328836\n" +
            "    },\n" +
            "    \"id\": 6940463,\n" +
            "    \"name\": \"Altstadt\",\n" +
            "    \"cod\": 200\n" +
            "}";

    private TestData() {
        // no instances
    }
}
The MockWeatherApiClient will just parse the JSON and return the data. We’ll also add some delay
to emulate network latency:
public class MockWeatherApiClient implements WeatherApiClient {

    @Override public Observable<WeatherData> getWeatherForCity(String cityName) {
        WeatherData weatherData = new Gson().fromJson(TestData.MUNICH_WEATHER_DATA_JSON, WeatherData.class);
        return Observable.just(weatherData).delay(1, TimeUnit.SECONDS);
    }
}
By having a configurable WeatherApiClient we no longer depend on any external conditions, we can
configure the client to return any data we want to test against. Let’s now figure out how to make
our test work with MockWeatherApiClient, rather than the real client that our app is using.
Dagger test setup
We’ll need to mirror the setup we’ve already performed in our app code, so let’s start with creating
the TestAppModule:
@Module
public class TestAppModule {

    private final Context context;

    public TestAppModule(Context context) {
        this.context = context.getApplicationContext();
    }

    @Provides @AppScope public Context provideAppContext() {
        return context;
    }

    @Provides public WeatherApiClient provideWeatherApiClient() {
        return new MockWeatherApiClient();
    }
}
This class looks pretty much like AppModule, but instead of creating the real WeatherApiClient
implementation through Retrofit, it simply instantiates our MockWeatherApiClient. Let’s now add
the TestAppComponent:
@AppScope
@Component(modules = TestAppModule.class)
public interface TestAppComponent extends AppComponent {

    void inject(MainActivityTest test);
}
TestAppComponent extends AppComponent and adds an inject() method that our test class will
use. Let’s change the setUp() method in the test class to the following:
@Before
public void setUp() {
    ((TestWeatherApp) activityTestRule.getActivity().getApplication()).appComponent().inject(this);
}
The last thing is to substitute the WeatherApp with a test double:
public class TestWeatherApp extends WeatherApp {

    private TestAppComponent testAppComponent;

    @Override
    public void onCreate() {
        super.onCreate();

        testAppComponent = DaggerTestAppComponent.builder()
                .testAppModule(new TestAppModule(this))
                .build();
    }

    @Override
    public TestAppComponent appComponent() {
        return testAppComponent;
    }
}
Notice that we’re now returning a TestAppComponent instead of the AppComponent. The interface of
the class remains the same, meaning that the app code will have no idea it’s working against a test
double.
We’re all done with the Dagger setup, but a crucial piece is missing: how do we make our tests use
TestWeatherApp instead of WeatherApp? The answer is - by using a custom test runner!
Implementing a custom test runner
The AndroidJUnitRunner used to run Espresso tests has a convenient method called
newApplication(), that we can override to substitute WeatherApp with TestWeatherApp:
public class WeatherTestRunner extends AndroidJUnitRunner {

    @Override
    public Application newApplication(ClassLoader cl, String className, Context context) throws InstantiationException,
            IllegalAccessException, ClassNotFoundException {
        String testApplicationClassName = TestWeatherApp.class.getCanonicalName();
        return super.newApplication(cl, testApplicationClassName, context);
    }
}
Also don’t forget to declare the new test runner in build.gradle:
defaultConfig {
    // rest of configuration

    testInstrumentationRunner "me.egorand.weather.runner.WeatherTestRunner"
}
And that’s it! We can run the tests with the following command:
./gradlew connectedAndroidTest
We now have a setup that will allow us to run our functional tests independent of the network condition and be sure that they’ll pass! Check the complete source code for this article on GitHub.
Conclusion
As I’ve mentioned in Testing a sorted list with Espresso, having a suite of acceptance tests is a great way to catch regressions and make sure most bugs are caught by your development team, not by your users. It’s important to make sure your tests are reliable: flaky tests just waste your team’s time on fixing them again and again, until everyone decides to stop running them at all.
By using Dagger we can decouple the logic of dependency injection from our code, which allows us to use test doubles and control some of the aspects of our application under test. This article describes using such technique to allow running network-related tests in offline mode and making sure they pass. It’s worth mentioning though, that this approach can’t be used if your tests are designed as end-to-end tests, since we’re not testing the app in real conditions, just like your users will. Still, it’s a perfectly valid approach for functional tests, and gives you a lot of flexibility in testing different aspects of your application logic.